I have always heard about this "funeral potato" dish but hadn't had it until recently. Perhaps it is because we live in the mid west and closer to Utah. I love it. My family loves it and you everything is very comforting. It's good ol' southern food if you ask me! The sour cream taste is definitely prevalent and adds to the charm of this dish. My friend Lisa made it as a side dish to accompany her Easter dinner. Please excuse the picture. It was taken with my phone. She had a ward cook book and it was submitted by Ann Crandall. Well, funny thing is I knew an Ann Crandall way back in my DeSoto, TX ward. Her husband was Larry Crandall. I wonder if it could be the same lady?!
Yield: 16 servings Prep: 10 minutes Bake: 350 Time: 30 minutes
Potato Casserole
24 oz. frozen shredded hash browns or (12 large potatoes)
2 cans cream of chicken soup (undiluted)
2 cups sour cream
1 cup grated cheddar cheese
1/2 cup melted butter
1/2 cup chopped onion (or use dried minced onion to taste)
2 cups corn flakes (crushed)
2 Tbl. melted butter
Boil potatoes with skins for 30 minutes. Cool, peel and grate into large bowl. (or thaw and put into large bowl) Combine soup, sour cream, cheese, 1/2 cup melted butter and onions. Gently blend into potatoes. Put in 9x13 pan. Combine crushed cornflakes and 2 TBL butter and sprinkle on top. Bake at 350 degrees for 30 minutes. Serves 16

Showing posts with label holiday. Show all posts
Showing posts with label holiday. Show all posts
Sunday, April 28, 2019


Wednesday, April 27, 2011
Sweet Potato Casserole

I can not believe that I had not posted this recipe to the blog! I have used this for every holiday and every gathering that I have been to, ever since my friend Cheryl C. made it at her home for our Easter gathering with her family! My husband's Aunt Teresa makes a sweet potato casserole similar to this as well. My friend, C got it from her neighbor who may have gotten it from Southern Living! LOL.
I believe the topping makes this dish most unique and scrumptious. It is always requested my mother in law always asks me for the recipe and I believe she has it down now! It brings groans of delight and smiles of pleasure when this dish makes its presence at our table.

Sweet Potato Casserole
Yields: 9x13 pan Bake: 350 Prep: 20 min Time: 35 min
Ingredients:
3 cups mashed sweet potatoes
2 eggs
1 cup sugar
1/2 tsp. salt
1 stick butter
5 ounces evaporated milk
1 tsp. vanilla
TOPPING: mix in seperate bowl (should crumble)
1/2 stick melted butter
2/3 cup brown sugar
1/3 cup flour
1 cup pecan peices
Mix all together. Place in greased 9x13 pan. Top with topping and bake at 350 degrees for 30-35 minutes.
Tuesday, April 26, 2011
Rainbow Waffles

We always have a great time for the holidays and I love to have fun and celebrate. We had many of our traditional St. Patty's traditions along with a few new ones. My children absolutely loved these and had a great time eating them. Their little pot of gold was sliced bananas! Way fun.
My recipe comes from Betty Crocker herself. It is my favorite go to, never fail nice and fluffy recipe!
WAFFLE RECIPE
Yields: 4 waffles com
INGREDIENTS
1 3/4 cups all purpose flour
1 TBL spoon baking powder
1/4 tsp salt
2 egg yolks
1 3/4 cups milk
1/2 cup cooking oil
2 egg whites
In a mixing bowl combine flour, baking powder and salt.
In another bowl beat egg yolks slightly. Beat in milk and oil. Add egg yolk mixture to flour mixture all at once. Stir just til combined
but still slightly lumpy.
In a small bowl beat egg whites till stiff peaks. (tips stand straight). Gently fold beaten egg whites into flour and egg yolk mixture, leaving a few fluffs of egg whites. DO NOT OVER MIX!
Pour 1 to 1 1/4 cups batter onto waffle grid of preheated lightly greased waffle maker. Close lid, do not lift lid until done. use fork to lift out.
Using food coloring tint waffle batter in separate bowls or cups or for easy pouring use Wilton bags or Ziploc bags. Starting with red place in center of waffle grid and as each color out will need more batter. ROY G. BIV
Red
Orange
Yellow
Green
Blue
Indigo
Violet
Thursday, February 3, 2011
Ground Hog pancakes
To Go with our ground hog hot chocolate! We had to have ground hog pancakes and I again, I bow to Gourmet Mom on-the-Go!
I have to admit hers came out cuter but what my kids don't know won't hurt them! I'm a firm believer of that, policy especially when it comes to food related things! Who says you have to tell them that the brownies they love so much are filled with yummy delicious pureed vegetables! NOT ME! Mums the word! The ingredients needed:
GROUND HOG PANCAKES
Pancake batter
green food coloring
donut holes
mini mm's ( you will use these for eyes and nose) I did not use them. You may omit
mini marshmellows
peanut butter or butterscotch chocolate chips
and half an apple for each pancake you make.
 A few of the ingredients! Go ahead and assemble the faces of the ground hog and
slice your apples in half! The apple helps to make the mound of the pancake.
Make your pancake batter according to directions and add green food coloring until it
is the color to your liking!
Assemble ground hog head
 Take your donut hole and place your butterscotch or peanut butter chip on both sides of the hole.
These will form the ears. I used melted chocolate and dotted my eyes with a toothpick
and then I used red gel to make the nose! Gourmet mom's pancakes were cuter but like I said, use
what you have and your kids will still believe you are the bomb!

pellets all around his hole before he retreated back in!
 Such a cute and adorable breakfast! Can't wait for the rest of the day! and once again, thank you
Gourmet mom on-the-go
I have to admit hers came out cuter but what my kids don't know won't hurt them! I'm a firm believer of that, policy especially when it comes to food related things! Who says you have to tell them that the brownies they love so much are filled with yummy delicious pureed vegetables! NOT ME! Mums the word! The ingredients needed:
GROUND HOG PANCAKES
Pancake batter
green food coloring
donut holes
mini mm's ( you will use these for eyes and nose) I did not use them. You may omit
mini marshmellows
peanut butter or butterscotch chocolate chips
and half an apple for each pancake you make.

slice your apples in half! The apple helps to make the mound of the pancake.
Make your pancake batter according to directions and add green food coloring until it
is the color to your liking!
Assemble ground hog head

These will form the ears. I used melted chocolate and dotted my eyes with a toothpick
and then I used red gel to make the nose! Gourmet mom's pancakes were cuter but like I said, use
what you have and your kids will still believe you are the bomb!

Place half an apple on bottom of plate. You could add peanut butter if you so desire.
Then place your pancake on top of the apple.
Cut a small hole out of the top of your pancake. I just dug a hole out. It looked more
realistic. Place your ground hog donut head in hole.
My little ground hog was so scared with what he saw that he dropped little ground hogpellets all around his hole before he retreated back in!

Gourmet mom on-the-go
Tuesday, October 6, 2009
GHOSTLY shepherds pie

A simple quick way to get the kids excited for fall and all its festivities.
Shepherds pie is one of my oldest daughter's favorite dinners. How lucky we are that it is simple and easy to make. Tonights dinner was compliments of the man of house.
lb ground beef
handful of dry minced onion
1 bag (12 oz) frozen mixed vegetables (we were out so we used, corn,peas and beans)
1/4 tsp. garlic powder
Mashed potatoes.
Shredded cheddar cheese
Directions:
1. Heat oven to 375°F. Spray 12-inch skillet with cooking spray. Add beef and onion; cook over medium heat 8 to 10 minutes, stirring occasionally, until thoroughly cooked; drain.
2. Add frozen vegetables, Heat to boiling. Reduce heat to medium-low. Cover and cook 8 to 10 minutes, stirring occasionally, until vegetables are crisp-tender.
3. Prepare your mashed potatoes
4. Start by layering your dinner, into a 9x13 pan. (the grave yard)
5. Bake 20 to 25 minutes or until potatoes are set and mixture is thoroughly heated.
6. Take a portion of the mashed potatoes and put it into a pastry bag. Be sure to have a large tip. Or use a freezer bag and cut a hole in the corner and pipe out mashed potato ghosts.
Garnish with peas for eyes or I used chocolate chips! HEY, chocolate isn't bad on mashed potatoes!
Tuesday, April 28, 2009
Parmesan Herb Monkey Bread

Parmesan Herb Monkey Bread
1 Pkg (about 30) frozen yeast rolls, thawed
1/4 cup melted butter or margarine
1 cup grated Parmesan cheese
1 Tbls each fresh (or one tsp dried) Rosemary, Basil & Thyme
1/4 tsp garlic powder
Grease fluted tube pan. Combine cheese, herbs and garlic. Dip each roll into butter and then roll in cheese/herb mixture to coat. Place coated dough evenly in pan. Let rise until double in size*.
Bake in a preheated 375 F oven 30 - 40 minutes or until well browned and top of bread sounds hollow when tapped. Remove from pan immediately to cool on wire rack.
*To hurry the process you can preheat your oven to 200 F, then turn the oven off and put pan of rolls in the oven to raise. Do not cover. When they are doubled in size turn the oven on to 375 and let them bake.
Monday, April 13, 2009
Chocolate covered Rice Krispies
These are fun for the kids. You can have them look much cuter. I think I saw these on Martha Stewart's site or Family circle or fun magazine. I was in the check out lane at the grocery store. All that matters is it was not my original idea.

Make your rice krispies according to directions on package. WE make ours in the microwave.
WE use a large glass bowl, one stick butter and one package of large marshmellows.
Place in microwave and cook for 3 minutes or until marshmellows double in volume
use 3/4 of a full box of rice krispy cereal.
Stir and pour out into a lightly buttered pan. You can use cookie cutters to shape your treats or just slice into squares.
IF you are going to make bunny treats.
Place krispies in fridge for 10-15 minutes. Remove from fridge.
Melt chocolate. Using white chocolate also. Tint the white chocolate with food coloring for a pink hue.
Immerse entire front and edges of crispy treat into either the chocolate or white chocolate. Lay on wax paper. Repeat this for all treats.
In a ziploc baggie or in a chocolate funnel add pink frosting and pipe eyes, nose, ears and whiskers.
Last stick a lollipop stick through the bottom. These are sold by wilton and can be found at any cake store or walmart in the baking section.

Make your rice krispies according to directions on package. WE make ours in the microwave.
WE use a large glass bowl, one stick butter and one package of large marshmellows.
Place in microwave and cook for 3 minutes or until marshmellows double in volume
use 3/4 of a full box of rice krispy cereal.
Stir and pour out into a lightly buttered pan. You can use cookie cutters to shape your treats or just slice into squares.
IF you are going to make bunny treats.
Place krispies in fridge for 10-15 minutes. Remove from fridge.
Melt chocolate. Using white chocolate also. Tint the white chocolate with food coloring for a pink hue.
Immerse entire front and edges of crispy treat into either the chocolate or white chocolate. Lay on wax paper. Repeat this for all treats.
In a ziploc baggie or in a chocolate funnel add pink frosting and pipe eyes, nose, ears and whiskers.
Last stick a lollipop stick through the bottom. These are sold by wilton and can be found at any cake store or walmart in the baking section.
Wednesday, December 24, 2008
holiday Sugar cookies

Cream together:
1/2 cup Butter
1 cup sugar
2 eggs beaten
1 TBL spoon milk or heavy cream
1 tsp. vanilla
Add:
2 1/2 cups flour
2 tsp Baking Powder
Preheat oven to 350 degrees and bake 8- 10 minutes
Your dough should not be sticky. Add a little extra flour so that your dough is workable. If you are using cookie cutters, roll out dough to whatever thickness you would like your cookies to be. Roll out dough on floured surface and flour your rolling pin. Choose a cookie cutter or a glass and cut out shapes.
If you are not going to frost these cookies you could sprinkle a little sugar on the tops before baking.
Bake on greased cookie sheet for 8 to 10 minutes. You do not want your cookies to show brown on top. They will be over baked. You will just barely begin to see the bottoms of the cookie turn brown. Another way to test if cookies are done is to lightly finger test. Touch cookie if it springs back it is ready to pull. If your cookie leaves an imprint leave in oven for an extra minute or two.
Remove cookies from baking sheet and let cool on wire rack.
Cool and then frost with cream cheese frosting
Bill prefers his sugar cookies thin and crispy. The rest of the family likes our cookies soft and thick.
Tuesday, December 23, 2008
Mini Cream Cheese Cakes

Cream Cheese filling
I.
2- 8oz. softened cream cheese
3 egss
2/3 cup sugar
1 tsp. vanilla
II.
vanilla wafers
cupcake fills
III.
pie filling

Put ingredients from step I. into blender and blend.
Put vanilla wafers into cupcake fills in tins
Fill 1/2 full with cream cheese mixture
Bake at 350 degrees for 15-20 minutes until set.
Let cool and top with pie filling.
Sunday, December 14, 2008
Easy Holiday Cookies
Easy Holiday Cookies
These easy to decorate kid friendly holiday cookies were a big hit with my 3 year old granddaughter. You just start with the basic ingredients: 8 oz white chocolate candy coating
1 tsp vegetable shortening
36 butter cookies (shaped like a flower with a hole in the middle)
assorted sugar crystals and sprinkles for decorating
Prepare a cookie sheet by lining with a sheet of waxed paper.
Melt the white chocolate candy coating and the veg shortening by placing them in a bowl in the microwave and microwaving on 50% power at 30 second intervals, stirring between cooking cycles, until candy is melted and smooth.
Then dip the cookies, front side down, in the melted chocolate and place on the prepared cookie sheet.
 Sprinkle with green sugar crystals (to give the effect of a wreath) and then decorate as desired with cinnamon hots, licorice strings (tied like a bow), or other sprinkles or decorations of choice. Allow to set until firm before storing.
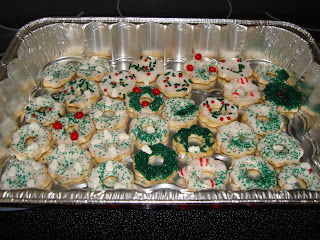 As you can see, the only limitations are the boundaries of your imagination! :^)
These easy to decorate kid friendly holiday cookies were a big hit with my 3 year old granddaughter. You just start with the basic ingredients:
 8 oz white chocolate candy coating
1 tsp vegetable shortening
36 butter cookies (shaped like a flower with a hole in the middle)
assorted sugar crystals and sprinkles for decorating
Prepare a cookie sheet by lining with a sheet of waxed paper.
Melt the white chocolate candy coating and the veg shortening by placing them in a bowl in the microwave and microwaving on 50% power at 30 second intervals, stirring between cooking cycles, until candy is melted and smooth.
Then dip the cookies, front side down, in the melted chocolate and place on the prepared cookie sheet.
 Sprinkle with green sugar crystals (to give the effect of a wreath) and then decorate as desired with cinnamon hots, licorice strings (tied like a bow), or other sprinkles or decorations of choice. Allow to set until firm before storing.
 As you can see, the only limitations are the boundaries of your imagination! :^)
Pumpkin Cheesecake

A nice alternative to holiday Pumpkin Pie, this is the Cheesecake Factory recipe for Pumpkin cheesecake.
Pumpkin Cheesecake
1 1/2 cups graham cracker crumbs
5 Tbls butter, melted
1 Cup sugar, plus 1 Tbls sugar (divided)
3 (8 oz) pkgs cream cheese, softened
1 tsp vanilla
1 cup canned pumpkin
3 eggs, room temperature
1/2 tsp cinnamon
1/4 tsp nutmeg
1/4 teaspoon allspice
whipped cream
Preheat oven to 350 F. Make the crust by combining the graham cracker crumbs with the melted butter and 1 Tbls sugar in a medium bowl. Stir to just coat all of the crumbs with the butter, then press the crumbs onto the bottom and about 2/3 of the way up the sides of a 9" springform pan. Seal the bottom and sides of the pan with tin foil. Bake the crust for 5 minutes, then set aside.
In a large mixing bowl, combine the cream cheese, 1 cup sugar, and vanilla. Mix with electric mixer on med speed until smooth. Add the pumpkin, eggs, cinnamon, nutmeg and allspice. Continue beating until smooth and creamy. Pour the filling into the pan.
Place the pan in a water bath.* Bake 60 -70 minutes, or until edges are firm but the center of the cake still has a light "jiggle". Remove from oven and allow to set in water bath on a cooling rack for 1 hour. Remove pan from water bath and allow to cool completely before covering. Once cake is completely cooled, cover and store in the refrigerator at least 12 hours before serving.
*To make a water bath, place the spring form pan in a baking dish, such as a lasagna pan, and place on rack in oven. Pour hot water into the baking dish outside the springform pan until in comes up about 1/2 way to the top. Using a water bath helps distribute the heat evenly and prevents the cheesecake from cracking on top.
Maple Turkey Breast w/cranberries

Instead of brining a whole turkey as I usually do, this Thanksgiving I cooked a large turkey breast and used this glaze to finish it off. With Make Ahead Gravy (recipe published previously) for the side dishes this was a hit with the whole family.
Maple Turkey Breast with Cranberries
5-6 lb turkey breast
2/3 cup dried cranberries
1/2 cup orange juice
2/3 cup maple syrup
2 Tbls butter
Bake turkey breast on rack in covered roaster pan at 325 F for 2 - 2 1/2 hours or until tender and juices run clear. Turn breast side down and wrap in tin foil, allow to cool completely before slicing.
When turkey breast is cool, bone and slice into serving size pieces. *Place slices in a 9X13 baking dish. Heat oven to 350 F. Place the cranberries, orange juice, maple syrup and butter in a 2 qt saucepan and bring to a boil. Slowly pour the mixture over the turkey slices. Cover with foil and bake 30 minutes or until juices bubble and turkey slices are heated through.
*Variation: To make this a one pan meal you can add canned sweet potatoes to the pan before pouring the maple syrup mixture over the meat.
Sunday, November 9, 2008
Hot Almond Orange Drink

This is a nice change from the hot cider usually served at fall and winter parties, mulled orange juice. MMmmm Good!
Hot Almond Orange Drink
1 1/2 cups sugar
2 cups water
1 (6 oz) can frozen orange juice
3/4 cup lemon juice
1 1/2 tsp almond flavoring
1 tsp vanilla
1/8 tsp ground cloves
1/8 tsp allspice
1/8 tsp cinnamon
2 quarts water
Heat sugar and 2 cups water in a pan large enough to hold 3 quarts until sugar is dissolved.
Add remaining ingredients and heat until hot. Do not boil. Serve warm. Leftover beverage can be cooled and stored in the refrigerator for up to 10 days.
Make Ahead Turkey Gravy

Make your holiday meal a little easier by preparing this delicious rich gravy ahead of time. It can be stored up to 3 months in the freezer or a week in the frig. On turkey day just heat it up, add the drippings from your freshly baked turkey and enjoy! This recipe originally came from Women's Day magazine.
Make Ahead Turkey Gravy
4 turkey wings -- about 3 lb.
2 medium peeled onions -- quartered
1 cup water
8 cups chicken broth, divided
3/4 cup chopped carrot
1/2 teaspoon dried thyme
3/4 cup all-purpose flour
2 tablespoons butter
1/2 teaspoon freshly ground pepper
Planning Tip: Make up to 3 months ahead and freeze in an airtight container. Refrigerate 2 days to thaw. Reheat in a saucepan, whisking often.
1. Heat oven to 400°F. Have ready a large roasting pan.
2. Arrange wings in a single layer in pan; scatter onions over top. Roast 1-1/4 hours until wings are browned.
3. Put wings and onions in a 5 to 6-qt pot. Add water to roasting pan and stir to scrape up any brown bits on bottom. Add to pot. Add 6 cups chicken broth (refrigerate remaining 2 cups), the carrot and thyme. Bring to a boil, reduce heat and simmer, uncovered, 1-1/2 hours.
4. Remove wings to cutting board. When cool, pull off skin and meat. Discard skin; save meat for another use.
5. Strain turkey broth into a 3-qt saucepan, pressing vegetables to extract as much liquid as possible. Discard vegetables; skim fat off turkey broth and discard (if time permits, refrigerate broth overnight to make fat-skimming easier).
6. Whisk flour into remaining 2 cups chicken broth until blended and smooth.
7. Bring turkey broth in pot to a gentle boil. Whisk in chicken broth-flour mixture and boil 3 to 4 minutes to thicken gravy and remove floury taste. Stir in butter and pepper.
At this point the gravy is ready to serve*, or pour into containers and refrigerate up to 1 week or freeze up to 3 months.
Makes 8 cups. Per 1/2 cup: 52 cal, 2 g pro, 6 g car, 0 g fiber, 2 g fat (1 g saturated fat), 4 mg chol, 516 mg sod.
*I like to add the drippings from the turkey just before serving, but this is a great way to have delicious gravy if you opt to fry or smoke your turkey this year.
Cream Caramels

Another holiday favorite candy.
Cream Caramels
2 cups sugar
3/4 cup corn syrup
1/2 cup butter
2 cups half & half
Butter a square pan 8X8".
Combine sugar, corn syrup butter and 1 cup of half & half in a large, heavy saucepan. Heat to boiling over a medium heat, stirring constantly. Stir in remaining cup of half & half.
Cook over medium heat (at a rapid simmer) stirring occasionally, to 245 F on a candy thermometer. (You will want to watch it closely after it reaches about 215 F and stir in frequently as it nears the 245 F point to prevent scorching.)
Pour into the prepared pan and allow to cool at room temperature. Cut into bite size squares for candies and wrap individually in waxed paper, or heat some over low heat using more half & half to thin it out to make a dipping caramel. Store in an airtight container, put in frig if keeping more than a few days.
Peanut Brittle

A holiday favorite, this is easier to make than you might think. Make sure you use a good candy thermometer, the rest is a breeze.
Peanut Brittle
1 1/2 tsp baking soda
1 tsp water
1 tsp vanilla
1 1/2 cups sugar
1 cup water
1 cup light corn syrup
3 Tbls butter
1 lb unsalted roasted peanuts
Butter 2 baking sheets.
Combine the baking soda, 1 tsp water and the vanilla in a small cup or dish. Set aside for later use.
In a large heavy saucepan combine the sugar, 1 cup water and the corn syrup. Cook over medium heat, stirring occasionally, to 240 F on candy thermometer.
Stir in the butter and peanuts. Cook, stirring constantly, to 300 degrees. Watch carefully so mixture does not burn. Immediately remove from heat. Give the reserved baking soda mixture a stir to mix, and then add to the pot. Stir well. The candy will foam up.
Quickly pour half of the candy mixture onto each of the prepared cookie sheets and, using the back of a wooden spoon, spread the candy mixture out as thinly and evenly as possible. Place pans on cooling racks (careful, they will be hot) and allow to cool completely. Break candy into pieces and store in airtight container.
Tip: Candy does not do well in humid conditions. Try to plan your candy making for a day when the weather is dry and you are not cooking anything else that will steam up your kitchen. A rainy day, even in an air conditioned house, can cause problems with your candy.
Rosemary nuts

An easy, delicious addition to any holiday buffet.
Rosemary Nuts
1 lb unsalted assorted nuts (cashews, almonds, peanuts, walnuts, pecans, brazil nuts, etc)
2 Tbls fresh rosemary, coarsely chopped
1/4 - 1/2 tsp cayenne pepper (depending on your heat tolerance)
2 tsp dark brown sugar
2 tsp kosher salt
1 Tbls butter, melted
Preheat the oven to 350 F. Toss the nuts in a large bowl to combine. Spread nuts on a cookie sheet and toast in the oven about 10 minutes or until light golden brown. Watch carefully so as not to burn.
While the nuts are roasting, combine the rosemary, cayenne, brown sugar, salt and melted butter. When the nuts are browned and still warm toss with the rosemary mixture to coat. Allow to cool completely, then store in an airtight container.
Thursday, September 25, 2008
White Chocolate Cheesecake

I made this for the first time about a year ago, and it has quickly become a family favorite. Make sure to check out the Hints for a Successful Cheesecake at the bottom. :)
10 ounces chocolate sandwich cookies (like oreos)
1/2 cup butter, melted
24 oz cream cheese, softened*
14 oz good white chocolate bar, broken into pieces
1 cup sugar
1/4 tsp salt
4 large eggs
1/2 cup heavy cream
1 1/2 Tbls vanilla extract
1 cup sour cream
Preparation: Preheat oven to 300 F and butter the inside of a 10 inch springform pan. Wrap the bottom of the pan in aluminum foil so that the foil completely covers the bottom and sides and is pressed firmly against the pan. (I use the extra wide foil so this can be accomplished with one solid sheet.)
Make the cookie crust: First crush the cookies in a food processor or with a rolling pin until very fine. Transfer to a small bowl and stir in the melted butter with a fork. Press the mixture into the bottom of the springform pan until you make an even layer. Place the pan in the oven and bake for 10 minutes. Remove pan and set aside.
Make the filling: Melt the white chocolate by placing a bowl over simmering water or using a double boiler. Stir the chocolate until smooth and set aside.
Use a stand mixer with a paddle attachment (or a hand mixer) to beat the cream cheese with the sugar and salt. Continue to beat until smooth, then add the eggs one at a time. After each egg, beat the mixture well and scrape down the sides and bottom of the bowl with a spatula.
Add heavy cream and vanilla. Beat well. Add the sour cream and beat well at slow speed.
Give the white chocolate a final stir to make sure it is smooth and add to the cream cheese mixture. Beat well at slow speed.
Pour into the prepared springform pan.
Make a Water Bath: Place the springform pan into a high sided pan such as a lasagna pan. Place onto middle rack of oven. Add hot water to the lasagna pan. The water should come up the side of the springform pan at least half way.
Bake for approximately 1 hour and 20 minutes (I find I usually end up baking it 5 - 10 minutes longer - just check it closely the last 20 minutes or so). When done, the cheesecake should be mostly solid around the edges but still jiggle a little in the center when you shake the pan. Remove from oven and let the cake stand at room temperature for about an hour.
Remove cheesecake from water bath and place in fridge (still in springform pan). Cool in fridge, uncovered, for at least 4 hours, preferably overnight. When completely cooled you may cover with plastic wrap.
To remove cake from springform pan, run a knife under hot water, then wipe dry. Run the knife around the edge of the cheesecake. Unbuckle the springform and remove the ring. Run the knife under the cheesecake to remove the bottom of the pan. Carefully transfer to a large platter.
*The tub of softened cream cheese does not work as well as the solid bricks of cream cheese softened for an hour or so on the counter.
Hints for a Successful Cheesecake:
1) Always bring refrigerated ingredients (eggs, cream cheese, sour cream, etc) up to room temperature before using
2) Always mix at the slowest speed and for the minimal time that will accomplish the task. Over beating can cause the cake to 'crack' on top.
3) Always use a water bath as described above to bake a cheesecake, even if the recipe does not call for it.
4) Always butter the inside ring of the springform pan. This prevents the cake from sticking to the sides, those preventing cracking when the cake shrinks as it cools.
Wednesday, August 13, 2008
Caramel Apples


The recipe makes a glossy caramel coating that sticks to the apples without pulling out your fillings.
1 1/2 tbsp. butter
1 1/2 cups light brown sugar
6 tbsp. water
Popsicle sticks
8 to 10 apples (Granny Apples)
Melt the butter in a saucepan. Add the brown sugar and water. Stir until it has a smooth consistency. Gently bring to a boil, then cover and simmer for 3 minutes, until the pan's sides get steamy and the mixture is thin but somewhat sticky. Remove from heat. Pierce the center of each apple with a Popsicle stick, then swirl in the caramel syrup until coated. Place apples on a greased cookie sheet to harden. Refrigerate for at least 1 to 2 hours. Serves 8 to 10.
Variations:: Once your apples are dipped into the caramel gently roll each apple in toppings and drizzle with the melted chocolates.
Chopped peanuts
melted white chocolate
melted dark chocolate
sprinkles
mini chocolate chips
coconut flakes
miniature marshmellows
crushed oreos
crushed pretzels
Wednesday, August 6, 2008
SE North Carolina Pork BBQ

SE North Carolina Pork BBQ
BBQ in North Carolina is a noun, not a verb. It refers to pulled pork in a vinegar based sauce. Try it! You'll never eat tomato based sauce again!
5-6 lb boston butt roast
The Rub:
1/4 cup New Mexico red chili powder
1 Tbls dark brown sugar
1 Tbls ground cumin
1 Tbls Kosher salt
1 Tbls sugar
1/2 Tbls fresh ground black pepper
1 tsp cayenne pepper
Mix together well and store in an airtight container.
The Finishing Sauce:
2 cups cider vinegar
1 Tbls peppercorns
1 tsp celery seed
1 tsp salt
1 Tbls hot pepper flakes
1 onion, finely chopped
1 cup water
Combine all ingredients in a large saucepan. Bring to a boil, reduce heat and simmer slowly, uncovered, for one hour. Strain to remove peppercorns if desired. Store in sealed container in the refrigerator.
To make the BBQ:
Rub the boston butt pork roast with a generous amount of bbq rub on all sides. Place the roast fat side up in a roasting pan and cover with tight lid or seal with tin foil. Bake at 250 F for 3 - 4 hours* or until meat pulls apart with a fork. Remove the remaining fat (much of it will have cooked off) and chop or pull meat. Pour a small amount of the finishing sauce over the meat and stir gently to coat. You don't want to overdue the sauce as it will pool in the bottom of the dish and can become rather strong. More sauce can always be added at the table to satisfy individual tastes.
*Meat may be cooked in a slow cooker if desired, cook for about 6-8 hours on low.
Subscribe to:
Posts (Atom)